
If you’ve followed our blog regularly, you’ve probably read our post on using visual regression testing tools and services to better test your applications’ front end look and feel. If not, take a few minutes to read through our previous post on this topic.
Now that you’re up to speed, let’s take what we did in our previous post to the next level.
In this post, we’re going to show how you can alter your test configuration and code to test mobile browsers through a given testing service (browserstack) as well as get better reporting out of our tests natively and through options available to us in Jenkins.
Adjusting the Fuzz Factor:
If you run your test multiple times across several browsers with the visual regression service using default settings, you may notice a handful of exception images cropping up in the diff directory which look nearly identical.

Browser fight!!!
If you happen to be testing across several browsers (using Browserstack or a similar service) which potentially have these browsers hosted in real or virtual environments with widely differing screen resolutions, this may impact how the visual-regression service performs its image diff comparison.
To alleviate this, either ensure your various browser hosts are able to display the browser in the same resolution or add a slight increase in your test’s mismatch tolerance.
As mentioned in our previous post, you can do this by editing the values under the ‘visual regression service’ object in your project’s wdio.conf file. For example:
visualRegression: {
  compare: new VisualRegressionCompare.LocalCompare({
    referenceName: getScreenshotName(path.join(process.cwd(), 'screenshots/reference')),
    screenshotName: getScreenshotName(path.join(process.cwd(), 'screenshots/screen')),
    diffName: getScreenshotName(path.join(process.cwd(), 'screenshots/diff')),
    misMatchTolerance: 0.25,
  }),
Setting the mismatch tolerance value to 0.25 in the above snipped would allow the regression service a 25% margin of error when checking screen shots against any reference images it has captured.
Better Test Results:
Also mentioned in the previous post, one of the drawbacks to given examples of using the visual-regression service in our tests is that there is little feedback being returned other than the output of our image comparison.

Having fun with that lack of feedback?
However, with a bit of extra code, we can make usable assertion statements in our test executions once a screen comparison event is generated.
The key is the checkElement() method which is really a WebdriverIO method that is enhanced by the visual-regression service. This method returns an object that contains some meta data about the check being requested for the provided argument.
We can assign the method call to a new variable, which, once we ‘deserialize’ the object into something readable (e.g. a JSON string) we can then leverage Chai or some other framework to use assertions to make our tests more descriptive.
Here’s an example:
it('should test some things visually', () => {
  ...
  let returnedContents = JSON.stringify(browser.checkElement('<my web element>');
  console.log(returnedContents);
  assert.includes('<deserialized text to assert for', returnedContents);
});
In the above code snippet, near the end of the test, we are calling ‘checkElement()’ to do a visual comparison of the contents of the given web element selector, then converting the object returned by ‘checkElement()’ to a string. Afterward, we are asserting there is some text/string content within the stringified object our comparison returned.
In the case of the text assertion, we would want to assert a successful match message is contained within the returned object. This is because the ‘checkElement()’ method, while it may return data that indicates a test failure, on its own will not trigger an exception that would appropriately fail our test should an image comparison mismatch occur.
Adding Mobile

Oooh – someone downloaded the pancake app!
Combining WebdriverIO’s framework along with the visual-regression service and a browser test service like Browserstack, we can create tests that run against real browsers. To do this, we will need to make some changes to our WebdriverIO config. Try the following:
- Make a copy of your wdio.conf.js
- Name the copy wdio.mobile.conf.js
- Edit your package.json file
- Copy the ‘test’ key/value pair under ‘scripts’ and past it to a new line, rename it ‘test:mobile’
- Point the test:mobile script to the wdio.mobile.conf.js config file and save your changes
Next, we need to edit the contents of the wdio.mobile.conf.js script to run tests only against mobile devices. The reason for adding a whole, new test config and script declaration is that due to the way mobile devices behave, there are some settings to declare for mobile browser testing with WebdriverIO and Browserstack which are incompatible with running tests against desktop browsers.
Edit the code block at the top of the mobile config file, changing it to the following:
var path = require('path');
var VisualRegressionCompare = require('wdio-visual-regression-service/compare');
function getScreenshotName(basePath) {
  return function(context) {
    var type = context.type;
    var testName = context.test.title;
    var browserVersion = parseInt(context.browser.version, 10);
    var browserName = context.browser.name;
    var browserOrientation = context.meta.orientation;
    return path.join(basePath,
    `${testName}_${browserName}_v${browserVersion}_${browserOrientation}_mobile.png`);
  };
}
Note that we’ve removed the declarations for height and width dimensions. As Browserstack allows us to test on actual mobile devices, defining viewport constraints are not only unnecessary, but it will result in our tests failing to execute (the height and width dimension object can’t be passed to webdriver as part of a configuration for a real, mobile device).
Next, update the visual-regression service’s orientation configuration near the bottom of the mobile config files to the following:
orientations: ['portrait', 'landscape'],
Since applications using responsive design can sometime break when moving from one orientation to another on mobile devices, we’ll want to run out tests in both orientation modes.
Stating this behavior in our configuration above will trigger our tests to automatically switch orientations and retest.
Finally, we’ll need to update our browser capability settings in this config file:
capabilities: [
{
  device: 'iPhone 8',
  'browserstack.local': false,
  'realMobile': true,
  project: 'My project - iPhone 8',
},
{
  device: 'iPad 6th',
  'browserstack.local': false,
  'realMobile': true,
  project: 'My project - iPad',
},
{
  device: 'Samsung Galaxy S9',
  'browserstack.local': false,
  'realMobile': true,
  project: 'My project - Galaxy S9',
},
{
  device: 'Samsung Galaxy Note 8',
  'browserstack.local': false,
  'realMobile': true,
  project: 'My project - Note 8',
},
]
In the code above, the ‘realMobile’ descriptor is necessary to run tests against modern mobile devices through Browserstack. For more information on this, see Browserstack’s documentation.
Once your change is saved, try running your tests on mobile by doing:
npm run test:mobile
Examine the image outputs of your tests and compare them to the results from your desktop test run. Now you should be able to run tests for your app’s UI across a wide range of browsers (mobile and desktop).
Taking Things to Jenkins
You could include the project we’ve put together so far into the codebase of your app (just copy the dev dependencies from your package.json your specs and configs into the existing project).
Another option is to use this as a standalone testing tool to apply some base screen-shot based verification of your app.
In the following example, we’ll go through the steps you can to set up a project like this as a resource to use in Jenkins to test a given application and send the results to members of your team.
Consider the value of being able to generate a series of targeted screen shots of elements of your app per build and send them to team members like a product manager or UX designer. This isn’t necessarily ‘heavy lifting’ from a dev ops standpoint but automating any sort of feedback for your app will trend toward delivering a better app, faster.
Assuming you have your project hosted in Github, you have administrative access to Jenkins and that your app is hosted in an environment Jenkins can access (your organization’s Amazon S3 bucket, hosted from a Docker image, etc.):
I. Create a new Jenkins job
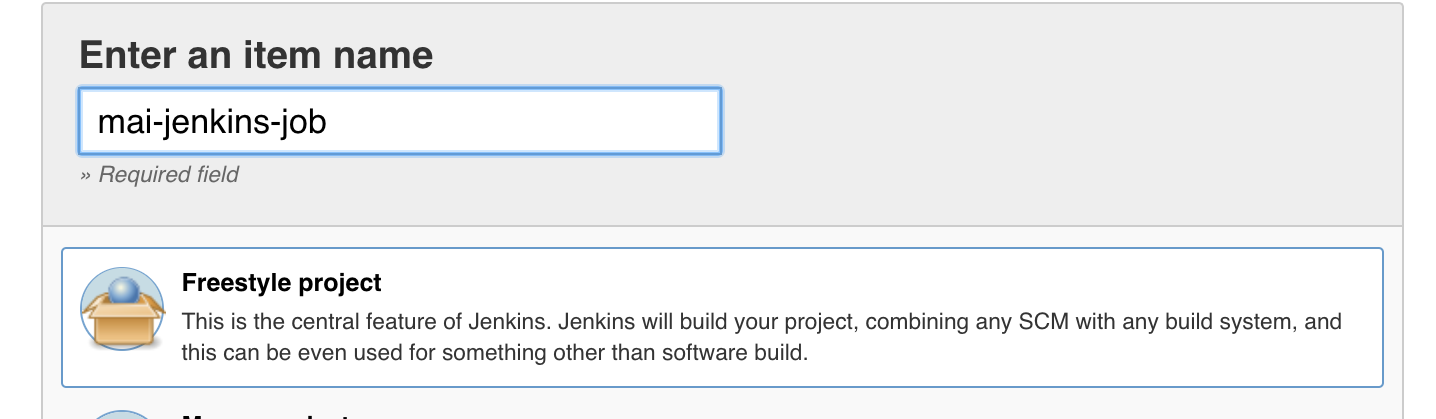
* Create a new Jenkins task within the same space the job that builds and ships your web app (should one exist). Assign it a name.
II. Configure the job to pull from your image testing app from Github
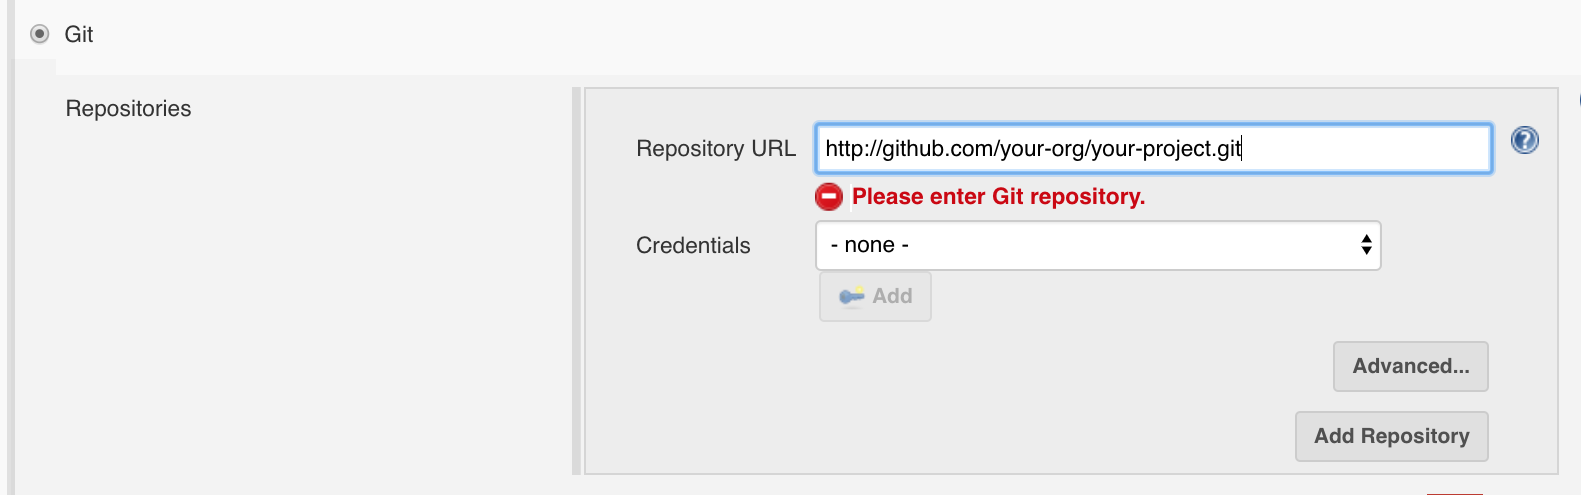
* Go to the source control configuration portion of the job. Enter the info for your repository for the test app you’ve built.
III. Set the project to build periodically

* Within the build settings of the job, choose the build periodically option and configure your job’s frequency.
Ideally, you would set this job to trigger once the task that builds and ‘ships’ your app completes successfully (thus, executing your tests every time a new version of the app is published).
Alternatively, to run periodically based on a given time, then enter something like ‘* 23 * * *’ into Jenkins’ cron configuration field to set your job to run once every day (in this case, at 11 PM, relative to your server’s configuration).
IV. Build your shell execution script

* Create a build step and for your task and choose the shell script option. You can embed your npm test script execution here.
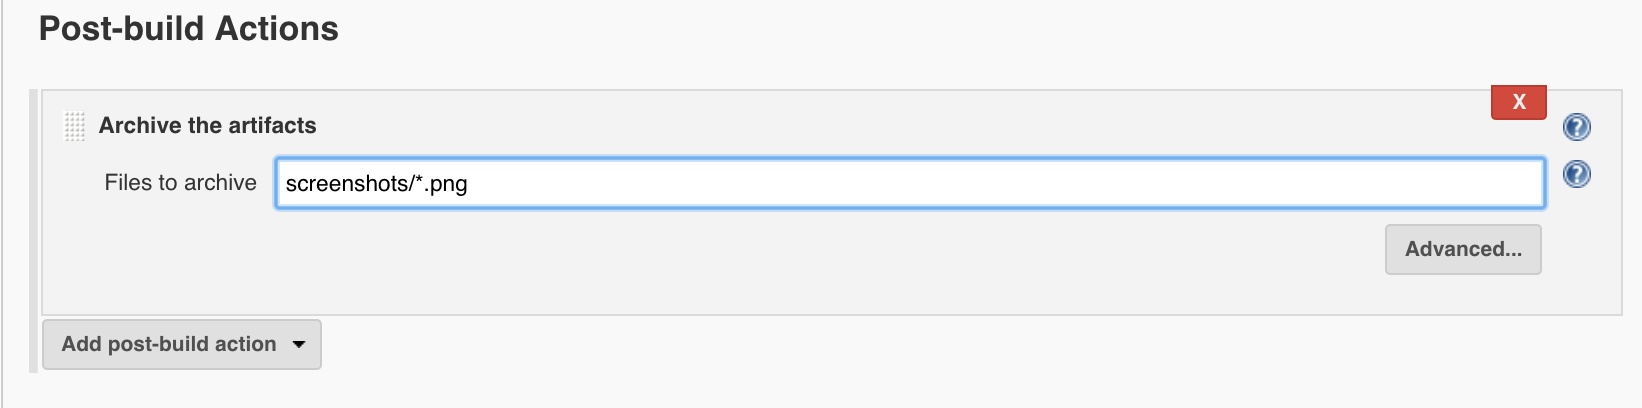
V. Collect your artifacts
From the list of post build options, choose the ‘archive artifacts’ option. In the available text field, enter the path to the generated screen shots you wish to capture. Note that this path may differ depending on how your Jenkins server is configured. If you’re having trouble pinpointing the exact path to your artifacts, echo the ‘pwd’ command in your shell script step to have the job list your working directory in the job’s console output then work from there.
VI. Sending email notifications

* Lastly, choose from the post build options menu the advanced email notification option.
Enter an email or list of email addresses you wish to contact once this job completes. Fill out your email settings (subject line, body, etc.) and be sure to enter the path to the screen resources you will wish to attach to a given email.
Save your changes and you are ready to go!
This job will run on a regular basis, execute a given set of UI specific tests and send screen capture information to inquiring team members who would want to know.
You can create more nuanced runs but using Jenkins’ clone feature to copy this job, altering to run your mobile-specific tests, diversifying your test runs.
Further Reading
If you’re looking to dive further into visual regression testing, there are several code examples online worth reviewing.
Additionally, there are other visual regression testing services worth investigating such as Percy.IO, Screener.IO and Fluxguard.