We all have secrets. Sometimes, these are guilty pleasures that we try to keep hidden, like watching cheesy reality TV or indulging in strange comfort food. We often worry:
“How do we keep the secret safe?”
“What could happen if someone finds out the secret?”
“Who is keeping a secret?”
“What happens if we lose a secret?”
At Bazaarvoice, our security team starts with these same questions when it comes to secret management. They are less interested in trivial secrets like who left their dishes in the office sink or who finished the milk. Instead, they focus on the secrets used in the systems that power a wide range of products for the organization. They include:
- API keys and tokens
- Database connection strings that contain passwords
- Encryption keys
- Passwords
With hundreds of systems and components depending on secrets at Bazaarvoice, enumerating them and answering the above questions quickly, consistently and reliably can become a challenge without guiding standards.
This post will discuss secret management and explain how Bazaarvoice implemented a Secret Catalog using open-source software. The post will provide reusable examples and helpful tips to reduce risk and improve compliance for your organization. Let’s dive in!
Secrets Catalog
Bazaarvoice is ISO27001 compliant and ensures its systems leverage industry standard tools and practices to store secrets securely. However, it isn’t always in the same place, and secrets can be stored using different tools. Sometimes AWS Secret Manager makes sense; other times, AWS KMS is a better choice for a given solution. You may even have a multi-cloud strategy, further scattering secrets. This is where a Secrets Catalog is extremely useful, providing a unified view of secrets across tools and vendors.
It may sound a little boring, and the information captured isn’t needed most of the time. However, in the event of an incident, having a secret catalog becomes an invaluable resource in reducing the time you need to resolve the problem.
Bazaarvoice recognized the value of a secrets catalog and decided to implement it. The Security Team agreed that each entry in the catalog must satisfy the following criteria:
- A unique name
- A good description of its purpose
- Clear ownership
- Where it is stored
- A list of dependent systems
- References to documentation to remediate any related incident, for example, how to rotate an API key
Crucially, the value of the secret must remain in its original and secure location outside of the Catalog, but it is essential to know where the secret is stored. Doing so avoids a single point of failure and does not hinder any success criteria.
Understanding where secrets are stored helps identify bad practices. For example, keeping an SSH key only on team members’ laptops would be a significant risk. A person can leave the company, win the lottery, or even spill a drink on their laptop (we all know someone!). The stores already defined in the catalog guide people in deciding how to store a new secret, directing them to secure and approved tools resistant to human error.

Admittedly, the initial attempt to implement the catalog at Bazaarvoice didn’t quite go to plan. Teams began meeting the criteria, but it quickly became apparent that each team produced different interpretations stored in multiple places and formats. Security would not have a unified view when multiple secret catalogs would ultimately exist. Teams would need additional guidance and a concrete standard to succeed.
We already have a perfect fit for this!
Bazaarvoice loves catalogs. After our clients, they might be our favourite thing. There is a product catalog for each of our over ten thousand clients, a data catalog, and, most relevantly, a service catalog powered by Backstage.
“Backstage unifies all your infrastructure tooling, services, and documentation to create a streamlined development environment from end to end.”
Out of the box, it comes with core entities enabling powerful ecosystem modeling:
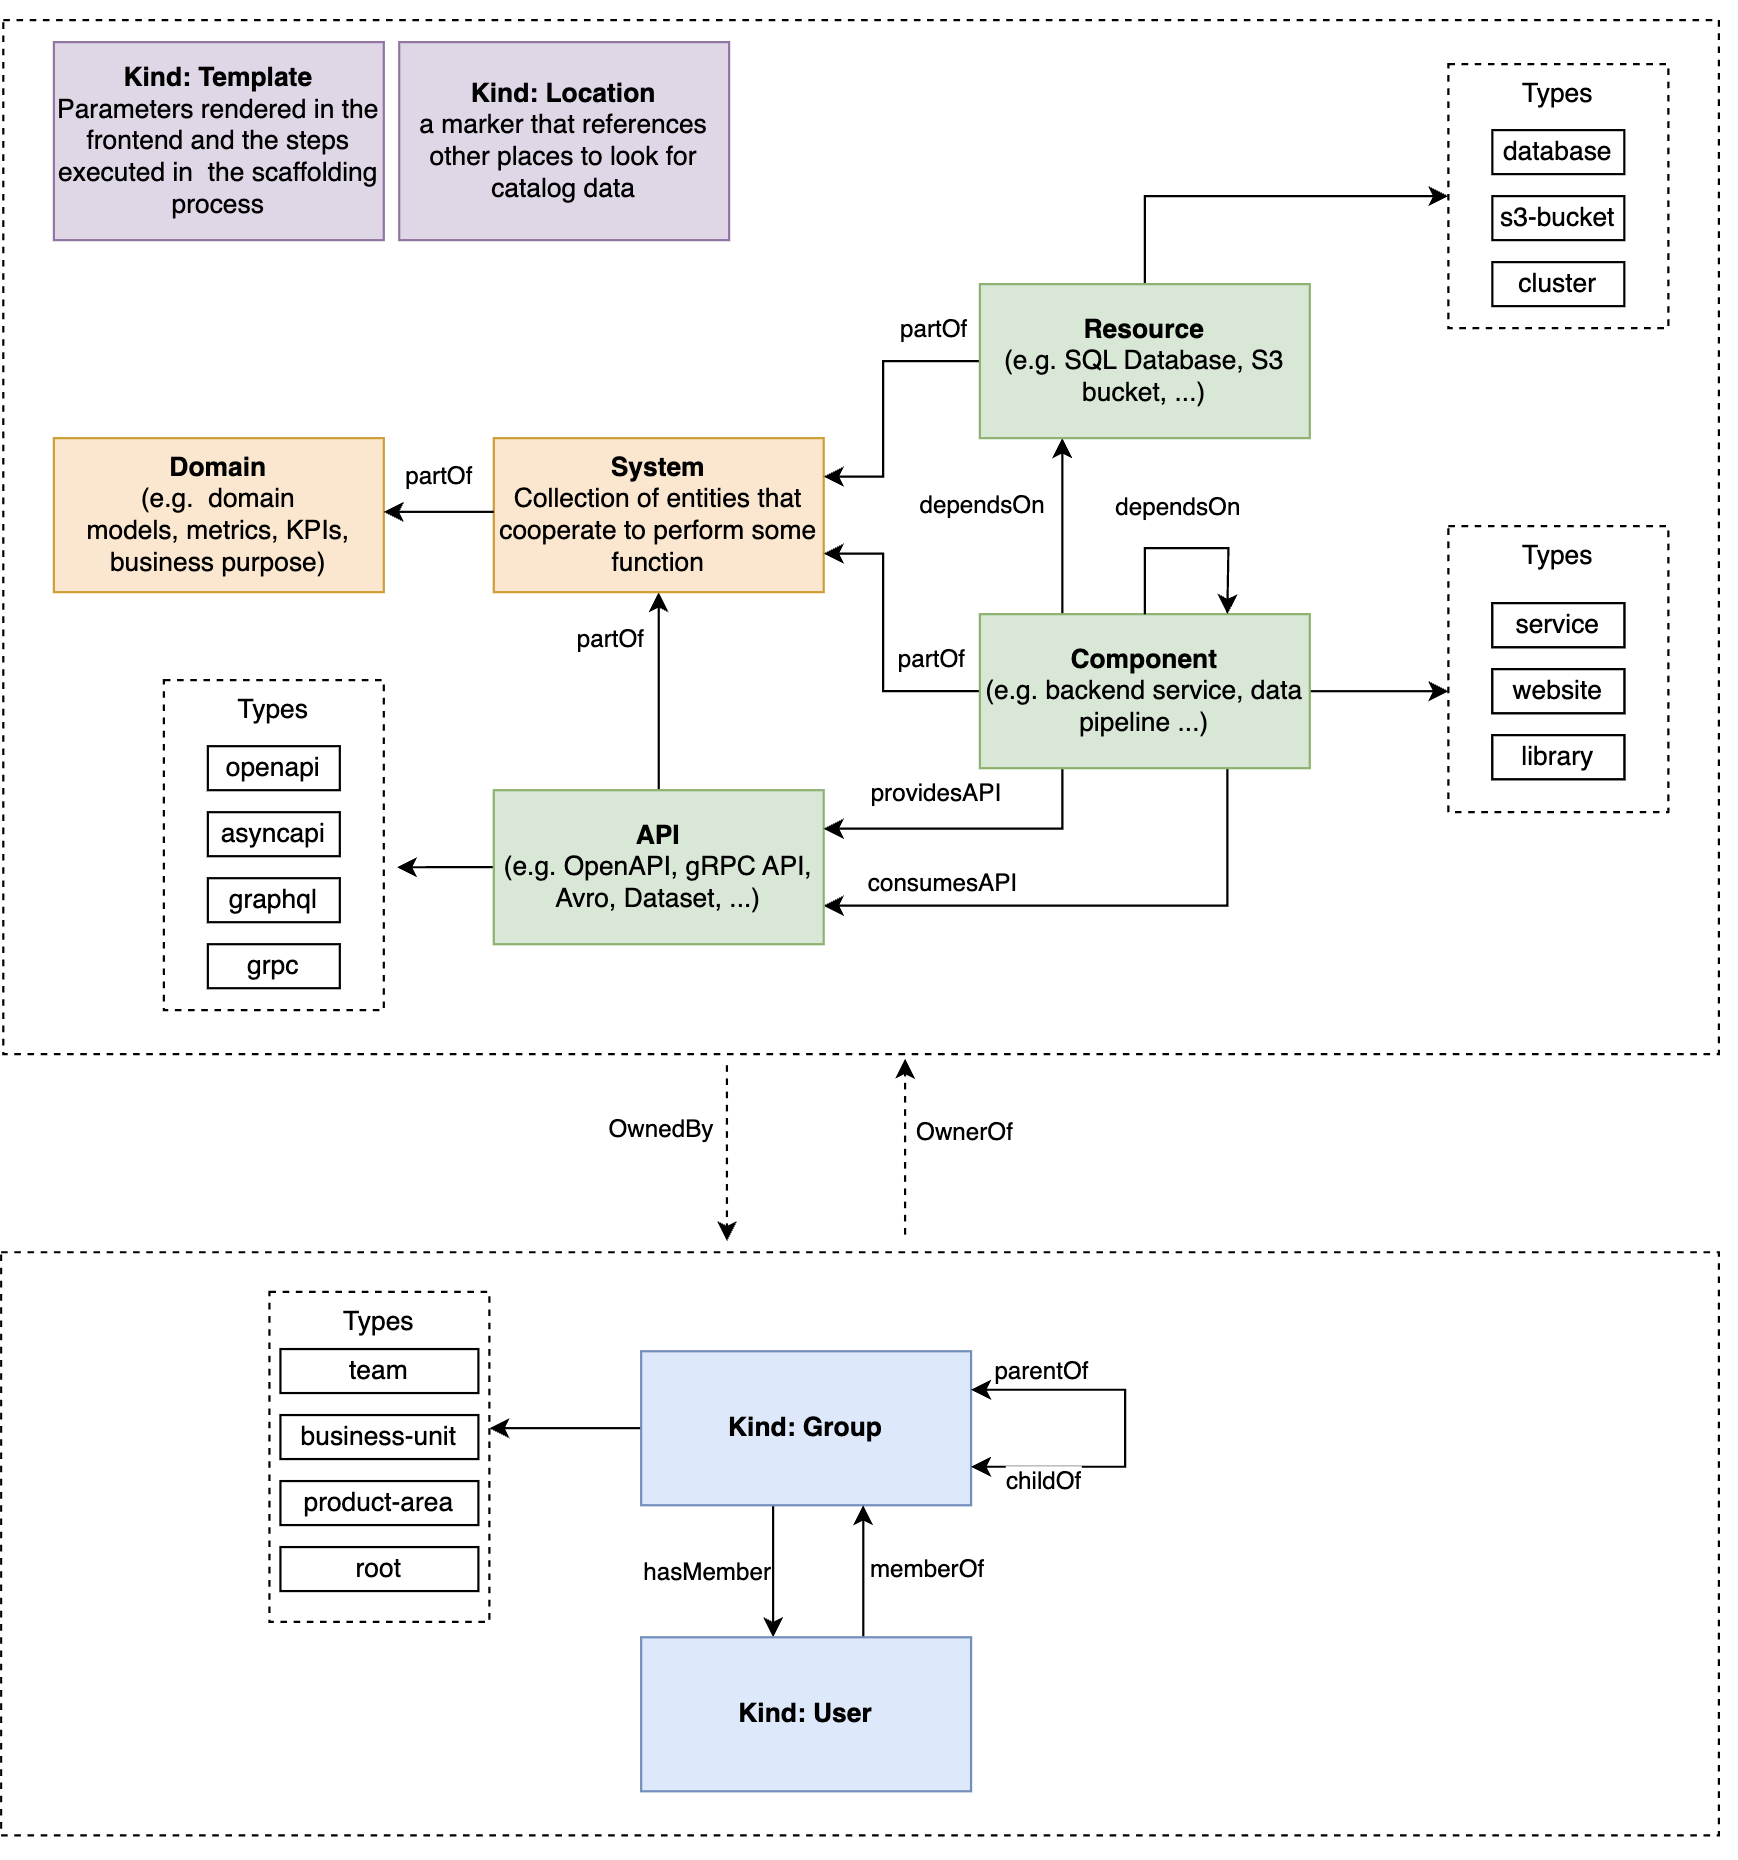
https://backstage.io/docs/features/software-catalog/system-model#ecosystem-modeling
As shown in the diagram above, at the core of the Backstage model are Systems, Components, and Resources, the most relevant entities for secret management. You can find detailed descriptions of each entity in the Backstage modeling documentation. Briefly, they can be thought about as follows:
System – A collection of lower-level entities, including Components and Resources, acting as a layer of abstraction.
Component – A piece of software. It can optionally produce or consume APIs.
Resource – The infrastructure required by Components to operate.
New Resource Types
Resources are one of the Backstage entities used to represent infrastructure. They are a solid fit for representing secrets, allowing us to avoid writing custom in-house software to do the same job. Therefore, we defined two new Resource Types: secret and secret-store.
Tip: Agree on the allowed Types upfront to avoid a proliferation of variations such as ‘database’ and ‘db’ that can degrade searching and filtering.
Having already invested the effort in modeling the Bazaarvoice ecosystem, adding the necessary YAML to define secrets and secret stores was trivial for teams.
Example minimal secret store:
apiVersion: backstage.io/v1alpha1
kind: Resource
metadata:
  name: aws-secrets-manager
  description: Resources of type 'secret' can depend on this Resource to indicate that it is stored in AWS Secrets Manager
spec:
  type: secret-store
  owner: team-x
Example minimal secret:
apiVersion: backstage.io/v1alpha1
kind: Resource
metadata:
name: system-a-top-secret-key
description: An example key stored in AWS Secrets Manager
links:
- url:https://internal-dev-handbook/docs/how-to-rotate-secrets
title: Rotation guide
spec:
type: secret
owner: team-1
system: system-a
dependsOn:
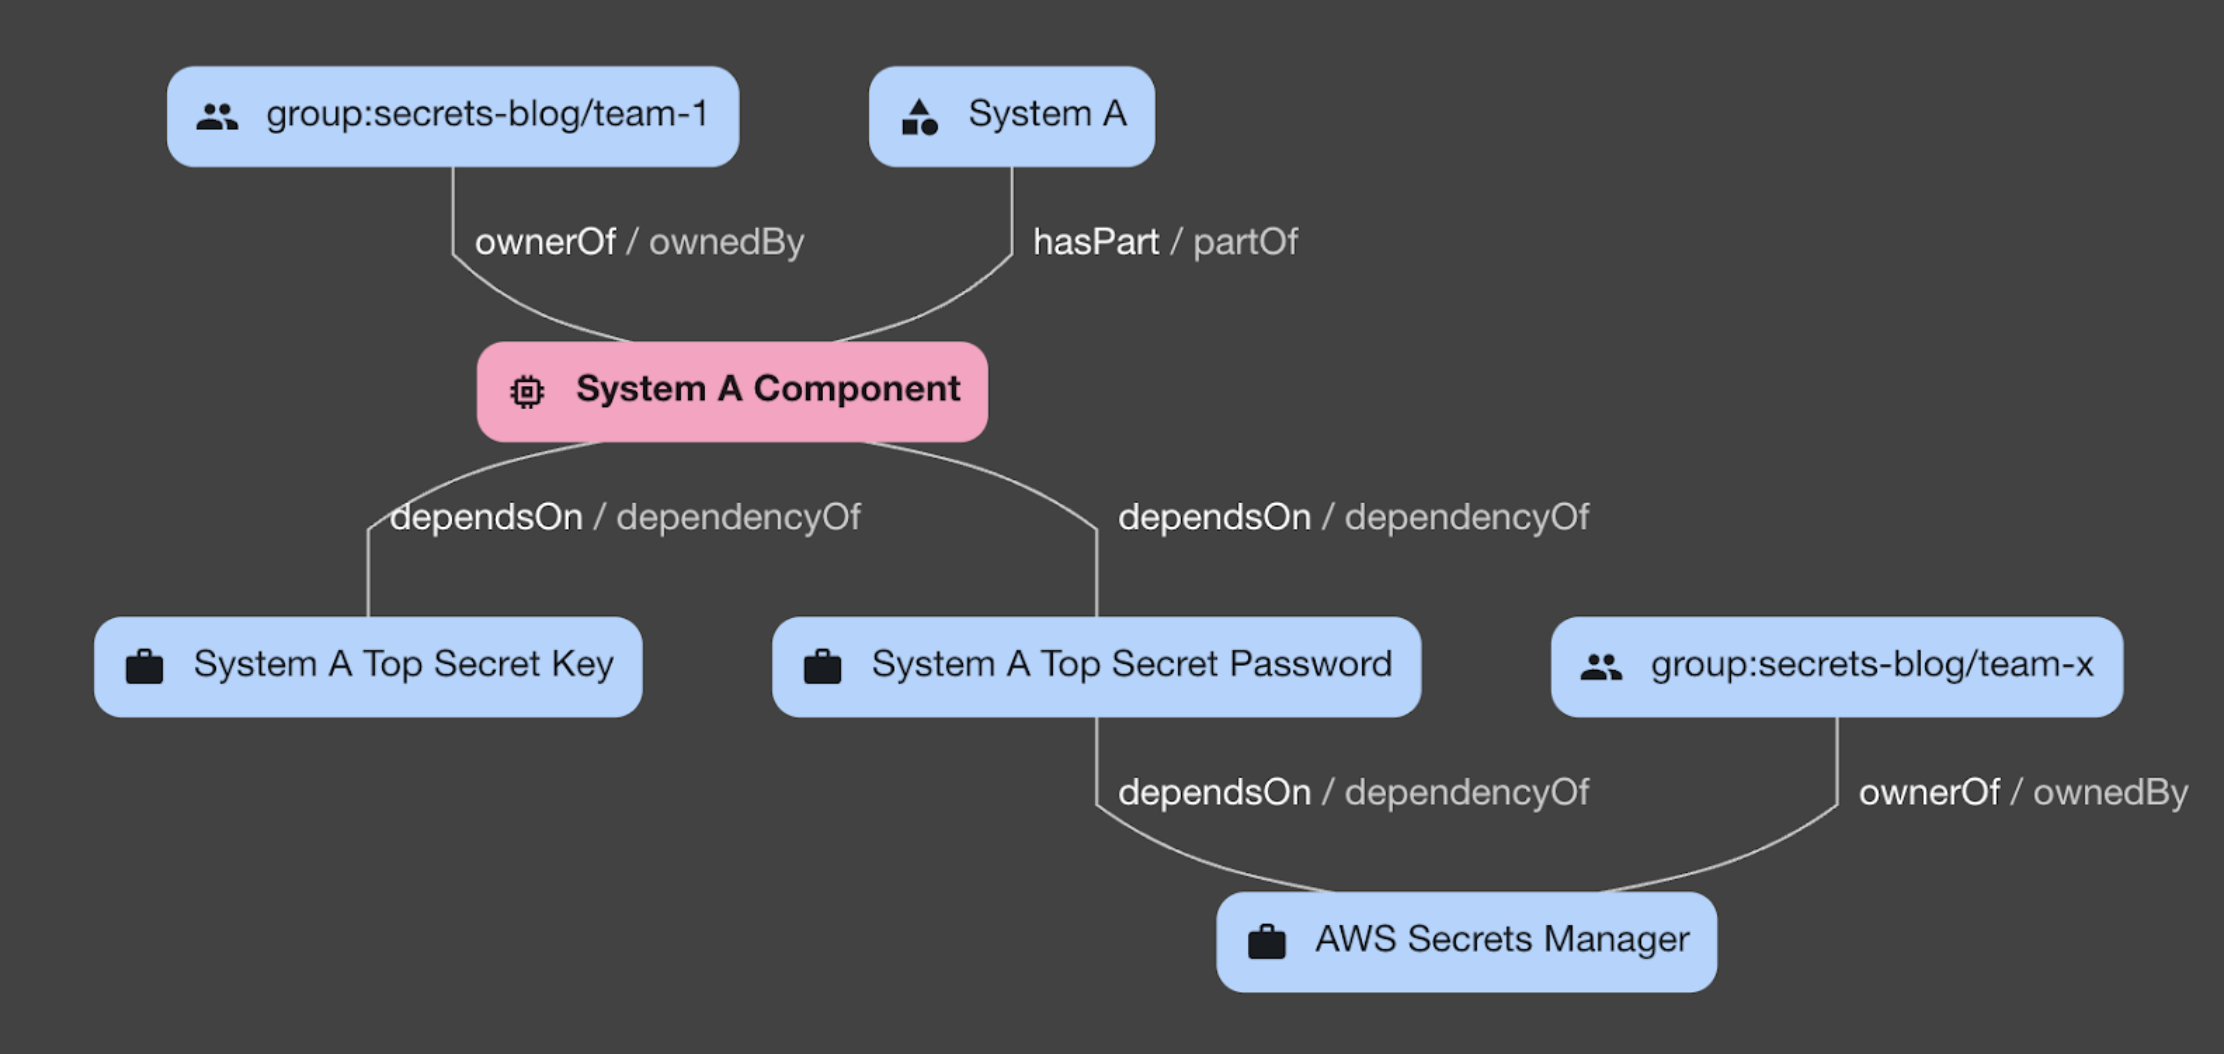
- resource:aws-secrets-managerFinally, to connect the dots to existing Systems, Components, and Resources, simply add a dependsOn section to their definitions. For example:
apiVersion: backstage.io/v1alpha1
kind: Component
metadata:
  name: system-a-component
  ...
spec:
  ...
  dependsOn:
    - resource:system-a-top-secret-key
How does it look?
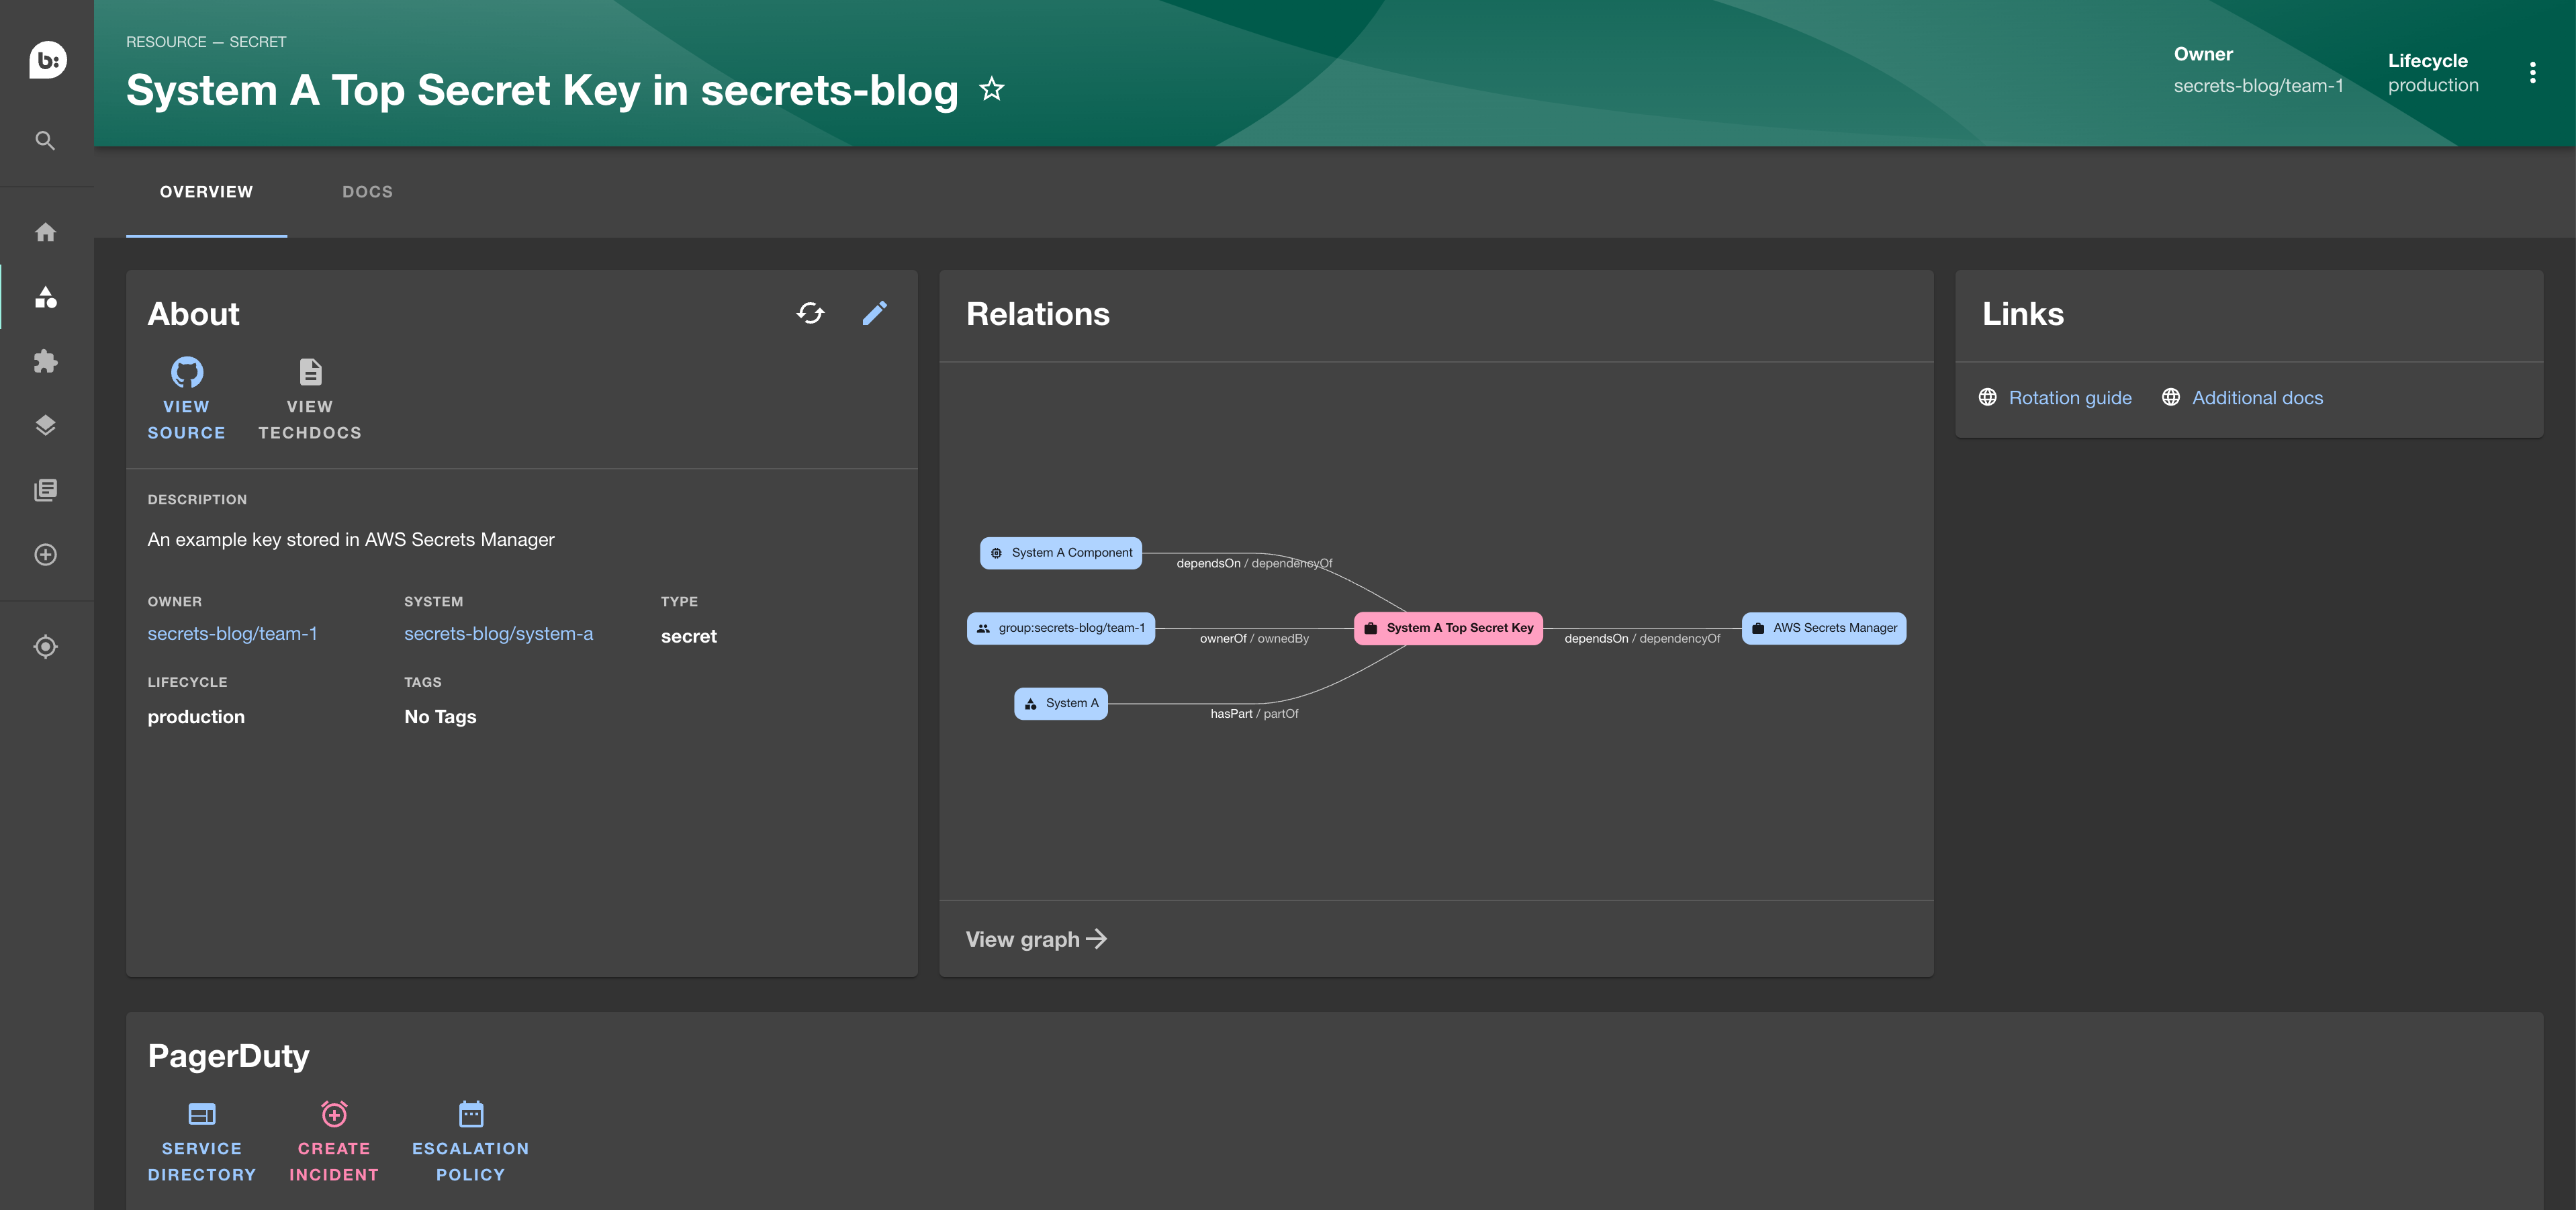
It’s fantastic in our eyes! Let’s break down the image above.
The “About” section explains the secret, including which system it’s associated with, its owner, and the fact that it’s currently in production. It also provides a link to the source code and a way to report issues or mistakes, such as typos.
The “Relations” section, powered by an additional plugin, provides a visual and interactive graph that displays the relationships associated with the secret. This graph helps users quickly build a mental picture of the resources in the context of their systems, owners, and components. Navigating through this graph has proven to be an effective and efficient mechanism for understanding the relationships associated with the secret.
The “Links” section offers a consistent place to reference documentation related to secret management.
Lastly, the “PagerDuty” plugin integrates with the on-call system, eliminating the need for manual contact identification during emergency incidents.
The value of Backstage shines through the power of the available plugins. Searching and filtering empower discoverability, and the API opens the potential for further integrations to internal systems.

Keeping it fresh
Maintaining accurate and up-to-date documentation is always a challenge. Co-locating the service catalog with related codebases helps avoid the risk of it becoming stale and has become a consideration for reviewing and approving changes.
We are early in our journey with this approach to a secrets catalog and aim to share our incremental improvements in further blog posts as we progress.