
If you’ve followed our blog for some time, you’ve likely encountered posts detailing how to engage in various kinds of software testing, from performance to data-driven to security and more.
This post continues that trend with a focus on testing your site for accessibility.
What is Accessibility?

If you are unfamiliar with the concept, accessibility, within the realm of web applications is a term that covers a wide range of concerns. The primary focus is codifying and helping to reinforce design standards that ensure the web is accessible to all – regardless of people’s ability to consume and interact with it.
This is a very large topic and its definition is beyond the scope of this blog post’s intent. If you’re looking for a starting point however, our friends at W3C.org can help you with that: https://www.w3.org/standards/webdesign/accessibility
If you want to cut to the chase, there are two major accessibility standards you should be aware of (and are generally considered the path toward compliance). Both of these are supported and covered by the W3C as international standards and can be reviewed in full here:
You can also visit this link for some related coding examples.
Why Accessibility?
Why should everyone be concerned with accessibility design issues? The short answer can be found from this quite from Sir Tim Berners-Lee, via the W3C:
“The power of the Web is in its universality.
Access by everyone regardless of disability is an essential aspect.”
A more complex answer is that, as the web reaches more and more global ubiquity, we as software creators need to take into account the range of needs to access the web from all users. This is simply fair play as web technology has matured and become evermore essential to our daily lives. There are also legal ramifications for not taking accessibility into account. Here are some examples:
- Blind Customers Locked out by Bank Web Upgrades
- ADA Lawsuits Continue Unabated 2017
- Target to pay $6 million to settle accessibility lawsuit
How Accessible is my Site?
If you’ve closely followed the design principles of WCAG 2.0, then your web application front end should be compliant with most modern accessibility software such as screen readers. However it’s difficult to verify your app’s end-user experience in this regard without actually sitting down with a browser, your app, some third-party tools and applying some old-fashioned manual testing.
The challenge with this – you’re likely already thinking – is that this is time consuming and labor intensive. If you are on a small software team or have a very tight deadline (or both), this level of manual testing might be a hard (but necessary) pill for your product team to swallow.
There are 3rd party services that can perform this level of testing for you. A quick google search can get you started down this path. However, if hiring a 3rd party is either logistically or financially out of reach, there are plenty of software tools that can help take the sting out of accessibility verification.
Chrome is your Friend (Really)?
As of this blog post, Google’s Chrome browser currently accounts for about 1/2 of all worldwide browser usage on the web. Chrome however is not only popular, it also has a lot of helpful tools under the hood to aid in web development.
In fact, you can use your basic, desktop version of Chrome to perform an accessibility audit of a given site you happen to have open in your browser. To try this trick out, simply do the following:
- Open your browser to a given site you wish to audit
- Open the Chrome developer tools console
- Under the developer console tabs, (e.g. Network, Elements, Console, etc.) search for and click on the Audits tab.
- Click the Perform Audit option, select Accessibility and click Run Audit to begin.
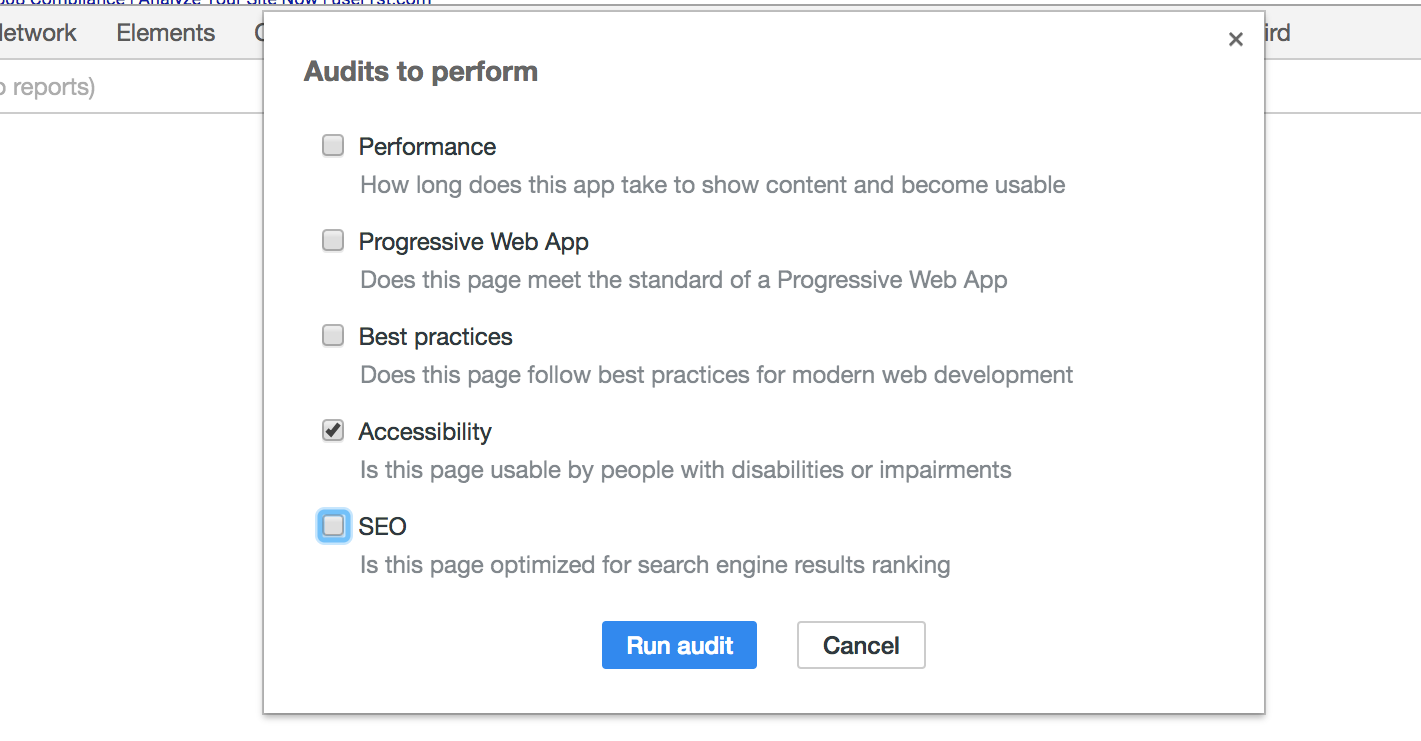
Look what we found under the hood!
The audit tool in this case will scan the contents of the site at the current URL you have open for markup patterns that support accessibility standards (e.g. proper element naming conventions, css settings, etc.) and flag patterns within the markup on the page that violate these standards. These of course are based on the WCAG and AIRA conventions mentioned at the beginning of this post.
This is a powerful but very easy to access and run set of tools for web developers (you can perform several kinds of audits, not just ones for accessibility). So easy in fact, you might be thinking that there must be a way to program these tools (and you would be right).
Illuminating Accessibility with Lighthouse!
Once you started the audit within Chrome, you might have noticed a message stating that something called Lighthouse was starting up, prior to the audit being executed.
Lighthouse in fact, is the engine that performs the audit. It’s also available as a library dependency or even its own stand-alone project.
Lighthouse can be incorporated into your project front end or build cycle in several ways. One of those is to use the Lighthouse as a standalone analyzation tool which you can use to verify the front end of your web app post deployment (think of this as another set of functional tests with a different, specific kind of output – in this case, an accessibility report.
You can get Lighthouse running locally via command line quickly by doing the following (assuming you have NodeJS installed):
1. Open a new terminal and do, npm install -g lighthouse
2. Once the latest version of lighthouse is installed, do, lighthouse "url of choice" -GA —output html —output-path ./report.html
Once the above command executes and finishes, you can open your Lighthouse report.html locally in your web browser:
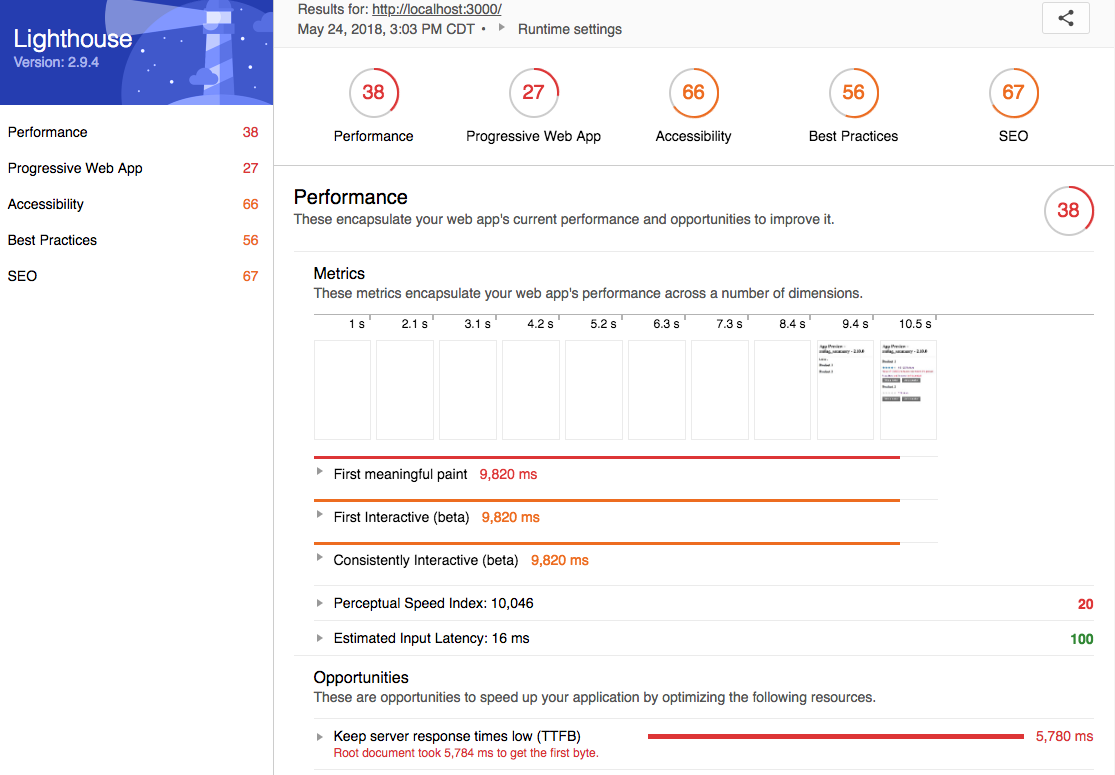
Lighthouse Report
Drill down into the different segments of the report to see what best practices you are following for accessibilityy (or performance, SEO or other web standards) and where you should target to improve your app.
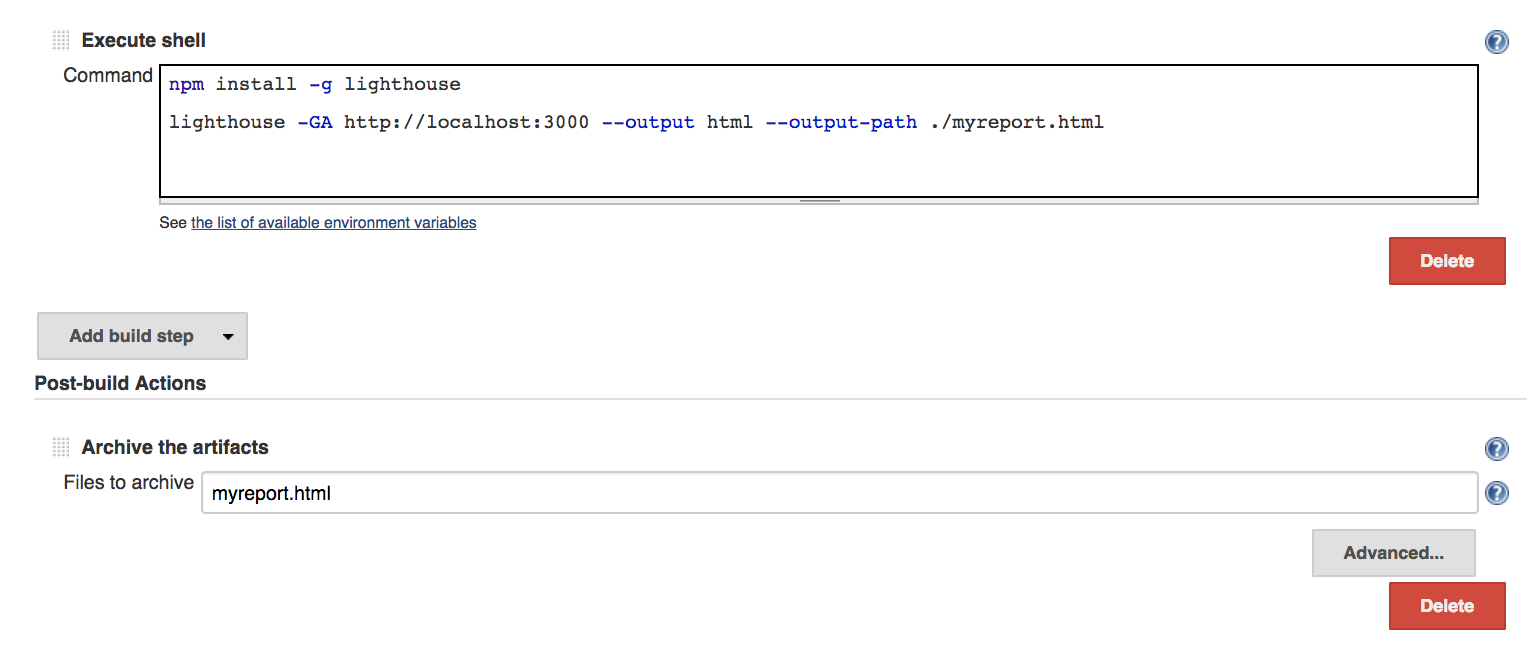
Jenkins configuration for Lighthouse
To include this report within your CI build process, just add the above Node command line statements to a shell script attached to your job of choice and make sure to archive the results (if configuring this in a Jenkins task, your job config will probably look something like this:)
Accessibility Linting?
By default, the report Lighthouse provides is expansive and may take a while to read through.
Fortunately, there are several options to move this form of testing further upstream. In this case, we are going to look at a small, open source project called Lightcrawler.
Lightcrawler allows you to call specific audit aspects of Lighthouse from within your NodeJS project. The benefit of doing this is that you can more specifically target what you are auditing and perform said audits before you ship your project through to the rest of your CI process.
You can install Lightcrawler into your project by simply doing npm install —save-dev lightcrawler.
Next, given your Node app is configured with a script that will generate and run the app locally, simply add this to your “scripts” portion of your app’s package.json file:
”audit:a11y”: "./node_modules/.bin/lightcrawler --url=http://localhost:8080 --config lighthouse-config.json",
With Lightcrawler you can configure an accessibility audit in a variety of ways that can meet your project needs. For the purpose of this post, we will configure Lightcrawler to run only tests classified within an accessibility audit, and to run all tests of that type currently available. Here is our configuration file:
{
  "extends": "lighthouse:default",
  "settings": {
    "crawler": {
      "maxDepth": 1,
      "maxChromeInstances": 5
    },
    "onlyCategories": [
      "Accessibility"
    ],
    "onlyAudits": [
      "accesskeys",
      "aria-allowed-attr",
      "aria-required-attr",
      "aria-required-parent",
      "aria-required-childres",
      "aria-roles",
      "aria-valid-attr-value",
      "audio-caption",
      "button-name",
      "bypass",
      "color-contrast",
      "definition-list",
      "dlitem",
      "document-title",
      "duplicate-id",
      "frame-title",
      "html-has-lang",
      "html-lang-valid",
      "image-alt",
      "input-image-alt",
      "lable",
      "layout-table",
      "link-name",
      "list",
      "list-item",
      "meta-refresh",
      "meta-viewport",
      "object-alt",
      "tabindex",
      "td-headers-attr",
      "th-has-data-cells",
      "valid-lang",
      "video-caption",
      "video-description"
    ]
  }
}
You can copy the JSON above and save it as lightcrawler.conf.js within your project directory and direct your script to the config file’s path.
Test out your newly added audit script but running npm run audit:a11y. If everything is in working order, you should receive a command line output detailing the number of audits executed by Lightcrawler and error output for any given audit tests that may have failed (and more importantly, why).
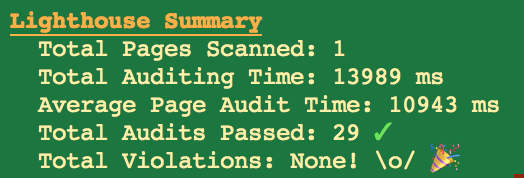
Lightcrawler Console Output
This may look similar to linting report output from something like Prettier or ESLint. Similar to the way Prettier or ESLint are used in pre-commit hooks within your project, you could add a Lightcrawler script to your pre-commit hook in order to better safeguard your application code from possible accessibility violations.
Beyond Auditing and Linting!
This should give you some ideas as to how you can reduce the overall effort required to deliver your apps’ web front end while still maintaining accessibility. By no means are the handful of tips presented here deep enough to fully cover everything under the accessibility umbrella. That task will require significant time and effort but, in keeping with the web’s initial intent of inclusivity and connectivity, one we as software developers should strive toward.